19 Diy Floating Shelves Ideas
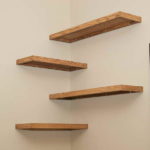
If you want to show your different collections, photos or achievements etc. in a manner which is attractive then perhaps the best source for you to achieve your purpose is DIY floating shelves. The Unique feature of DIY floating shelves is that they are designed in such a way that when a person looks at them he feels that the shelf is standing without any support. The direct extension of the shelves out of the wall without any support has made these shelves to be known as DIY floating shelves. In this article we will be sharing with you some steps which will be help for you if you want to construct or build DIY floating shelves for yourself. These steps are as follows
- In the first step of DIY floating shelves construction you need to purchase or cut out wooden panels which should be identical in size. The number of wooden panels should be two per shelf
- Similarly try to cut out or purchase at least two wood strips whose size is between 1-2 inches
- Cut the wooden strips into three separate pieces, however keep in mind while cutting that one strip should equal the panel’s length and other should equal its width.
- In this step the wooden strips should be connected or attached with one of the panels
- On the top of the frame attach the second panel
- Apply the glue on the wood and let it dry for at least a couple of hours.
- Try to smooth the shelf which is finished by an orbital sander
- The shelf should be finished by any finishing solution or paint
- The hollow space between the shelves should be measured
- Another 1-2 inch wood strip should be cut or purchased, however this time for the hollow space
- Get two more wooden strips which equal the length of the hollow space
- The wall mount should be tested
- Finally the shelf mount should be attached with the wall